Regardless of your teaching style, you're going to want to provide students with content - articles to read, worksheets to practice, diagrams to explore, maps to color, etc. While OneNote allows the students complete freedom in constructing content within their own space, you as the teacher will want to give them things to work on or at least consider. That's the topic for today -- "handing out".
For me, anything I hand out first gets stored in the Content Library - I want to be able to place the material in the right section and in the right page order to give it context to a student looking over the totality of the course. If it's differentiated (i.e. not every student gets the same thing) we can use subpages, color or tags to provide that information to the student. And this is personal and not policy, I always want to make sure that every student has access to the full breadth of content regardless of where they may be working and provide a structure that makes it meaningful when they're home alone.
 First things first -- we need to add some capability to OneNote. Remember, OneNote is a general purpose note-taking tool. Architects, lawyers, doctors, police -- everyone uses it for their own reasons but teachers have particular needs. That's where the Class Notebook AddIn fits.
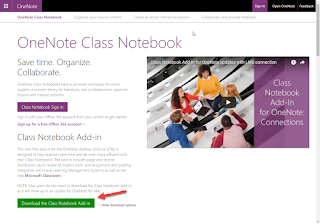
Visit http://www.onenote.com/classnotebook and download the Tool. Close any open OneNote and run the install. If you're Mac, just update your OneNote.
When you restart OneNote, you now have a new ribbon along the top. It's broken in two five sections (colors added by me):
We're only concerned about pushing content out to students today, so let's do that. You can push content out from anywhere in any of your OneNotes (the page doesn't have to be in your Content Library) but for the sake of this description, and to get used to putting things there, that's what we'll do. You can push it out from a personal OneNote, a department OneNote or another Class Notebook. The idea is that information can come from anywhere but can still get to the student.
Last time, I used Insert Printout to put my Course Information Sheet into my Content Library. I'm going to distribute that to all of my students (since they would normally receive a paper copy). So I click into my Content Library and then click on the Course Information Sheet.
Go to the Class Notebook ribbon and click on Distribute Page (1).
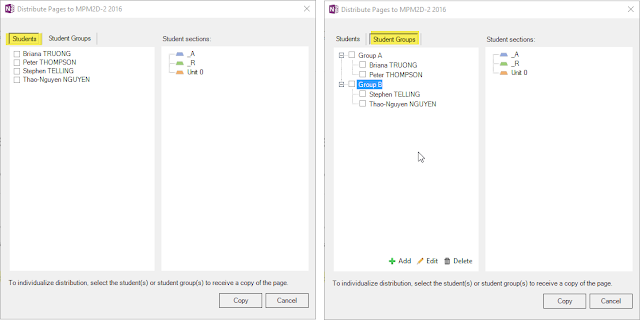
 You get additional options, too -- you can distribute to individual students, choose several random students (the pop up on the left), or set up groups (pop up on the right) for when you've created different arrangments of your class (as a math teacher, I will often have students working on different topics at different times - and this can be fluid so I can change these groups at will).

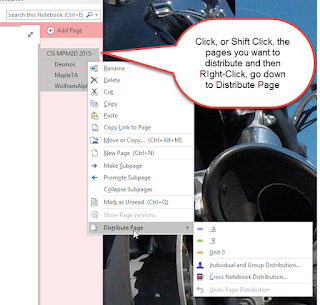
One of the suggestions we made was to make the buttons on the Content portion to be available on the right-click menu, and sure enough, if you right-click a page (or several pages) you'll notice you have the option to send those pages to the students without having to go to the ribbon. I use OfficeLens on my phone (Android & iPhone/iPad) and the OneNote Web Clipper on Chrome & Edge to grab a lot of content (oh, that's a cool picture to discuss in class! or oh, I'm stealing that idea she just posted!, etc) -- it goes into my personal OneNote for review, but I can push things out to students from there with a simple right-click. Any time we can reduce the number of clicks, we save time for the teacher to be doing the really important part of teaching, which is giving feedback. And that's our next topic...
So far we've done:
Creating your first OneNote Class Notebook
The first page of your Class Notebook
Putting content in your Class Notebook
--- this post
Distributing content in your Class Notebook (the video)
Facilitating Feedback in OneNote (Review Student Work)
For me, anything I hand out first gets stored in the Content Library - I want to be able to place the material in the right section and in the right page order to give it context to a student looking over the totality of the course. If it's differentiated (i.e. not every student gets the same thing) we can use subpages, color or tags to provide that information to the student. And this is personal and not policy, I always want to make sure that every student has access to the full breadth of content regardless of where they may be working and provide a structure that makes it meaningful when they're home alone.
 First things first -- we need to add some capability to OneNote. Remember, OneNote is a general purpose note-taking tool. Architects, lawyers, doctors, police -- everyone uses it for their own reasons but teachers have particular needs. That's where the Class Notebook AddIn fits.
Visit http://www.onenote.com/classnotebook and download the Tool. Close any open OneNote and run the install. If you're Mac, just update your OneNote.
When you restart OneNote, you now have a new ribbon along the top. It's broken in two five sections (colors added by me):
Content (yellow, the topic de jour) - this is how we will easily "push" as much content as we want to as many students as we desire
Review (orange) - the reason why we use OneNote in the first place -- how to easily provide feedback to students
Manage (purple) - these buttons just send you back to the Main Menu on the web we ran into when we first set up the Notebook. When you press one of these, your default browser will open and you'll be able to quickly add students, coteachers or even create a whole new ClassNotebook (this can be convenient if you have a long-term project with a smaller group of students)
Connections to LMSs (green) - you can actually sync students & assessment data with your LMS, if supported! I'm assuming you're not yet connected but it you are, it can be convenient.
Resources - Microsoft help & support. They have been very responsive to teacher input and so you are strongly encouraged to provide feedback, a lot and often! Seriously - we've floated suggestions to them and within a week there's an update to the Tool.
And... an Update button can show up! Updates happen quite often so if you see the Update button appear, press it.
We're only concerned about pushing content out to students today, so let's do that. You can push content out from anywhere in any of your OneNotes (the page doesn't have to be in your Content Library) but for the sake of this description, and to get used to putting things there, that's what we'll do. You can push it out from a personal OneNote, a department OneNote or another Class Notebook. The idea is that information can come from anywhere but can still get to the student.
Last time, I used Insert Printout to put my Course Information Sheet into my Content Library. I'm going to distribute that to all of my students (since they would normally receive a paper copy). So I click into my Content Library and then click on the Course Information Sheet.
Go to the Class Notebook ribbon and click on Distribute Page (1).
So
Now, the OneNote tool is smart -- it knows which Sections the students already have (remember, I set up an A, R and Unit 0 section when I first created the Notebook). So, all I have to do is select the Unit 0 option and every student will get a copy of the Course Information sheet page in their Unit 0 section automagically. That's it, done! Handing out has never been easier. And students don't have to open anything, they don't have to download or log in -- the page appears in their OneNote. OneNote does bold the Unit 0 and Page name to indicate to the student where there is new material. You get additional options, too -- you can distribute to individual students, choose several random students (the pop up on the left), or set up groups (pop up on the right) for when you've created different arrangments of your class (as a math teacher, I will often have students working on different topics at different times - and this can be fluid so I can change these groups at will).
One of the suggestions we made was to make the buttons on the Content portion to be available on the right-click menu, and sure enough, if you right-click a page (or several pages) you'll notice you have the option to send those pages to the students without having to go to the ribbon. I use OfficeLens on my phone (Android & iPhone/iPad) and the OneNote Web Clipper on Chrome & Edge to grab a lot of content (oh, that's a cool picture to discuss in class! or oh, I'm stealing that idea she just posted!, etc) -- it goes into my personal OneNote for review, but I can push things out to students from there with a simple right-click. Any time we can reduce the number of clicks, we save time for the teacher to be doing the really important part of teaching, which is giving feedback. And that's our next topic...
So far we've done:
Creating your first OneNote Class Notebook
The first page of your Class Notebook
Putting content in your Class Notebook
--- this post
Distributing content in your Class Notebook (the video)
Facilitating Feedback in OneNote (Review Student Work)


Comments