I had a teacher message me on Monday saying that he was having a guest talk to his class from Bogotá, Colombia and what would be the best way to web-conference with her and record it?
The absolute easiest way for anybody to do that is with Skype4Business, a business-level version of Skype -- it's surprising robust with weak internet connections and provides almost any option you'd expect for web-conferencing. We have used it each summer to teach French and now Math to students around the world.The result today ... he runs up and says "Geez, it's so easy!"
Here's the guide I gave him:
1) Head on over to Office365 -- http://portal.office.com
3) Click on NEW and then choose CALENDAR EVENT.
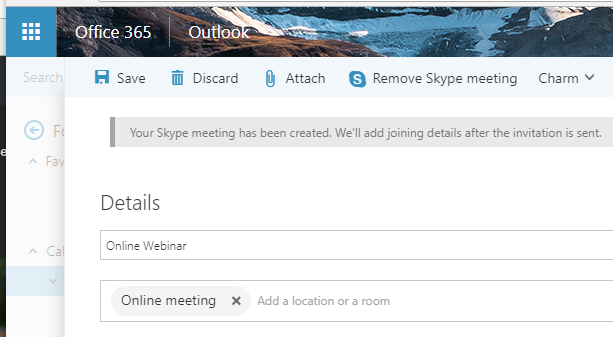
4) You get your regular Appointment window ... but now you want to click on ADD SKYPE MEETING

5) After you click ADD SKYPE MEETING, the location is set to "Online Location". When you hit SAVE (or after adding people to the call, you can click SEND) the next time you open the Event, you will get the link to the Chat Room.

Notice that you can just create the Skype Meeting with no one invited and just share the link with whomever you want, outside of the Outlook event scheduling.
If you've invited your guests to the event inside of Outlook, they'll receive the link to the Skype4B room anyways. But you can just copy the link and paste it into a Word document, a OneNote (as we do with the online math/French courses) or just email or tweet it out.
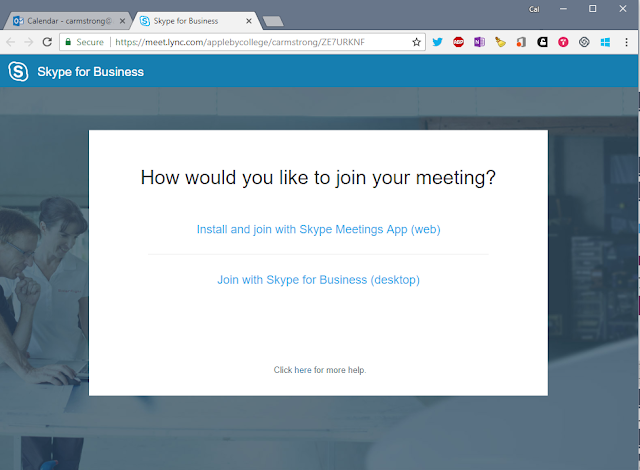
When anyone clicks on the link, they'll get the option to use the Skype4B client or download the web-app.

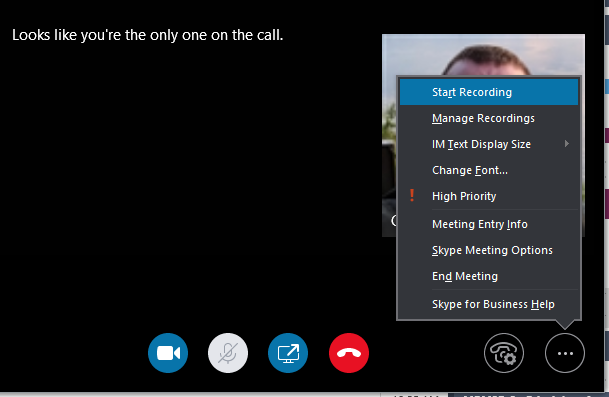
When YOU open the the meeting YOU need to use the Skype4Business client because that's how you get the option to record a meeting. When you start the meeting in the S4B client, you can click on the 3-dot menu in the lower right corner and choose START RECORDING. It will create a cloud-based MP4 of all the audio & screensharing that goes on in the meeting. You'll be able to see all of your meetings by clicking on the 3-dot menu and choosing MANAGE RECORDINGS.

Your participants do not need the Skype4Business client, nor do they need a Microsoft or Offic365 account. When they click on the link, they have the option of installing the WebClient (Mac or PC), or there are mobile phone apps that the links will open as well.
A really handy thing to know about the link you created -- it's active for A YEAR from the last time you used it.. So when I did my summer online math course, I created one link that we used all summer and we used it for our 4-hour class each morning and any math extra help that was needed throughout the rest of the day.
One last comment. We did do a test of Zoom alongside Skype4B -- Zoom did have a better quality audio over Skype4B, but video & screen sharing was better on Skype4B, and Zoom looked a little simpler for new users. But, given the unlimited time and recording available through Skype4B -- teachers shouldn't have to think about limitations; Zoom only gives you 40 minutes of meeting time and our classes are 60 minutes, for examples, and my summer classes were 4 hours! -- and how it integrated into our exisiting Office365 structure, users should be encouraged to take advantage of that integration & power. Over time, Skype4B is being integrated even deeper into Microsoft's Team software, and the linkages between Skype4B and Office365 applications will be even stronger.

5) After you click ADD SKYPE MEETING, the location is set to "Online Location". When you hit SAVE (or after adding people to the call, you can click SEND) the next time you open the Event, you will get the link to the Chat Room.

Notice that you can just create the Skype Meeting with no one invited and just share the link with whomever you want, outside of the Outlook event scheduling.
If you've invited your guests to the event inside of Outlook, they'll receive the link to the Skype4B room anyways. But you can just copy the link and paste it into a Word document, a OneNote (as we do with the online math/French courses) or just email or tweet it out.
When anyone clicks on the link, they'll get the option to use the Skype4B client or download the web-app.

When YOU open the the meeting YOU need to use the Skype4Business client because that's how you get the option to record a meeting. When you start the meeting in the S4B client, you can click on the 3-dot menu in the lower right corner and choose START RECORDING. It will create a cloud-based MP4 of all the audio & screensharing that goes on in the meeting. You'll be able to see all of your meetings by clicking on the 3-dot menu and choosing MANAGE RECORDINGS.

Your participants do not need the Skype4Business client, nor do they need a Microsoft or Offic365 account. When they click on the link, they have the option of installing the WebClient (Mac or PC), or there are mobile phone apps that the links will open as well.
A really handy thing to know about the link you created -- it's active for A YEAR from the last time you used it.. So when I did my summer online math course, I created one link that we used all summer and we used it for our 4-hour class each morning and any math extra help that was needed throughout the rest of the day.
One last comment. We did do a test of Zoom alongside Skype4B -- Zoom did have a better quality audio over Skype4B, but video & screen sharing was better on Skype4B, and Zoom looked a little simpler for new users. But, given the unlimited time and recording available through Skype4B -- teachers shouldn't have to think about limitations; Zoom only gives you 40 minutes of meeting time and our classes are 60 minutes, for examples, and my summer classes were 4 hours! -- and how it integrated into our exisiting Office365 structure, users should be encouraged to take advantage of that integration & power. Over time, Skype4B is being integrated even deeper into Microsoft's Team software, and the linkages between Skype4B and Office365 applications will be even stronger.


Comments