Scrolling through my Feedly a few weeks ago, I came across a Richard Byrne blogpost describing something called a Hyperdoc, so I read through and thought, hey... they're just describing a OneNote page! (And I'm old enough to think, "Hey, Webquest!")
And so I dug in a little bit more and I found they wrote a whole book about the process, except they called them Hyperdocs and used GoogleDocs to jury-rig things!
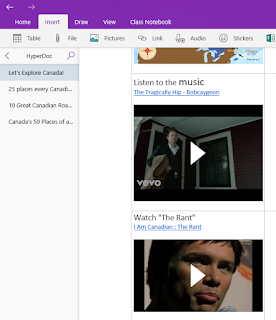
In OneNote, you really don't need many instructions to do this if you're familiar at all with OneNote. The overall process is relative straightforward - create a OneNote page, insert a table into it. In the first column, place all the resources you'd like the students to look through. The second column is a space for their thoughts on each piece. The authors have a great collection of Hyperdocs for you to look at here: https://hyperdocs.co/samples
Once you have the template filled out, you can then use the ClassNotebook Tool to distribute the HyperDoc directly into the student's OneNote private section to work on. If you are differentiate the HyperDoc for groups of students, you can do that, too. Since students can't see each other's private sections, they don't know if you've modified the reading level for some students -- students will only see each others' products in the shared CollabZone that is built into OneNote ClassNotebook for you.
 Then, they develop a product based on what they've read and what your objective for the lesson is.
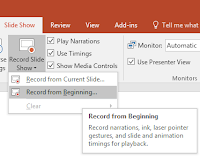
In the HyperDoc example, it's an Adobe Spark video ... but of course, I would do a PowerPoint presentation saved as an MP4 Video. What's nice about that is that PowerPoint has great templates, a Design Advisor and then, when you're ready to save as a Video, they can either just SAVE AS MP4 or use their devices to record their presentation using their voice & digitalink to mark up their slides. And PowerPoint is Collaborative so if you have students working together they can share the document and work on the slides at the same time.
Now, I have to admit that I find them a bit too structured for my classes but I think the focus is really on Elementary students. So I'm going to make up an example based on the Template that the Hyperdoc folks ( Lisa Highfill, Sarah Landis, and Kelly Hilton. ) have offered US Road Trip.
 You can see the result here: Canada Road Trip OneNote Hyperdoc (I'm not a Social Studies teacher, so view the approach through a mathematics teacher lens!)
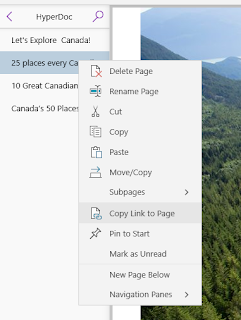
Now... you can build a lot more interesting Hyperdocs in OneNote using the internal linking and the password protection options within OneNote. You can see how I did a Breakout last year ... build this idea into the Hyperdoc!
Benefits to doing Hyperdocs in OneNote?
1) Use the OneNote WebClipper to capture articles & photostories directly into OneNote instead of having student access them online. This avoids slow internet connections, cookies and advertising (which can often be inappropriate or provocative). You can see that I've added my articles to my OneNote -- you can go to the link or the offline article for comparison.
 2) YouTube, Vimeo and Microsoft Stream videos embed directly into the OneNote ... this again saves tracking, advertisements and suggested videos. This also means that the STUDENT videos they create as their product are embedded both in their personal section and in the Collabzone for common viewing... no need for a collection of links.
3) ANYTHING else can be dragged-and-dropped into the OneNote "Hyperdoc" ... PDFs, audio files, video files, PowerPoints. A OneNote page is just like a giant email attachment space, so anything you could attach to an email you can drop on a OneNote page.
4) All the student notes, content & products are stored in the OneNote -- nothing gets lost and it's available for the teacher to give feedback on through the teacher's own device, without interrupting the student.
5) The CollabZone ... once the student has done their product in their OneNote page, they can copy it into the CollabZone and it is instantly available to the rest of the class for feedback.
6) If the Wifi goes out (or the network is really slow) a lot of your and students' content is already there so they can keep working!
And so I dug in a little bit more and I found they wrote a whole book about the process, except they called them Hyperdocs and used GoogleDocs to jury-rig things!
In OneNote, you really don't need many instructions to do this if you're familiar at all with OneNote. The overall process is relative straightforward - create a OneNote page, insert a table into it. In the first column, place all the resources you'd like the students to look through. The second column is a space for their thoughts on each piece. The authors have a great collection of Hyperdocs for you to look at here: https://hyperdocs.co/samples
Once you have the template filled out, you can then use the ClassNotebook Tool to distribute the HyperDoc directly into the student's OneNote private section to work on. If you are differentiate the HyperDoc for groups of students, you can do that, too. Since students can't see each other's private sections, they don't know if you've modified the reading level for some students -- students will only see each others' products in the shared CollabZone that is built into OneNote ClassNotebook for you.
 Then, they develop a product based on what they've read and what your objective for the lesson is.
 In the HyperDoc example, it's an Adobe Spark video ... but of course, I would do a PowerPoint presentation saved as an MP4 Video. What's nice about that is that PowerPoint has great templates, a Design Advisor and then, when you're ready to save as a Video, they can either just SAVE AS MP4 or use their devices to record their presentation using their voice & digitalink to mark up their slides. And PowerPoint is Collaborative so if you have students working together they can share the document and work on the slides at the same time.
 |
| PowerPoint's "RecordVideo" lets you narrate & digitally ink over your slides (and practice your narration to get it right!) |
Now, I have to admit that I find them a bit too structured for my classes but I think the focus is really on Elementary students. So I'm going to make up an example based on the Template that the Hyperdoc folks ( Lisa Highfill, Sarah Landis, and Kelly Hilton. ) have offered US Road Trip.
 You can see the result here: Canada Road Trip OneNote Hyperdoc (I'm not a Social Studies teacher, so view the approach through a mathematics teacher lens!)
Now... you can build a lot more interesting Hyperdocs in OneNote using the internal linking and the password protection options within OneNote. You can see how I did a Breakout last year ... build this idea into the Hyperdoc!
Benefits to doing Hyperdocs in OneNote?
1) Use the OneNote WebClipper to capture articles & photostories directly into OneNote instead of having student access them online. This avoids slow internet connections, cookies and advertising (which can often be inappropriate or provocative). You can see that I've added my articles to my OneNote -- you can go to the link or the offline article for comparison.
 2) YouTube, Vimeo and Microsoft Stream videos embed directly into the OneNote ... this again saves tracking, advertisements and suggested videos. This also means that the STUDENT videos they create as their product are embedded both in their personal section and in the Collabzone for common viewing... no need for a collection of links.
3) ANYTHING else can be dragged-and-dropped into the OneNote "Hyperdoc" ... PDFs, audio files, video files, PowerPoints. A OneNote page is just like a giant email attachment space, so anything you could attach to an email you can drop on a OneNote page.
4) All the student notes, content & products are stored in the OneNote -- nothing gets lost and it's available for the teacher to give feedback on through the teacher's own device, without interrupting the student.
5) The CollabZone ... once the student has done their product in their OneNote page, they can copy it into the CollabZone and it is instantly available to the rest of the class for feedback.
6) If the Wifi goes out (or the network is really slow) a lot of your and students' content is already there so they can keep working!


Comments