[I did have 3 hours of Parent Teacher Conferences tonight, but I wanted to make sure I got my November daily post in!]
I spent way too much time as a kid reading through the Choose Your Own Adventure books. Like these folks (link) I would map out the different paths to see what possibilities existed in the text. If you haven't ever read one, the format is pretty simple (well, to the reader). You start at Page 1 and read a few paragraphs that are on the page, describing your situation. In "The Cave of Time" you're out hiking in the woods and come across a cave that you decide to explore.
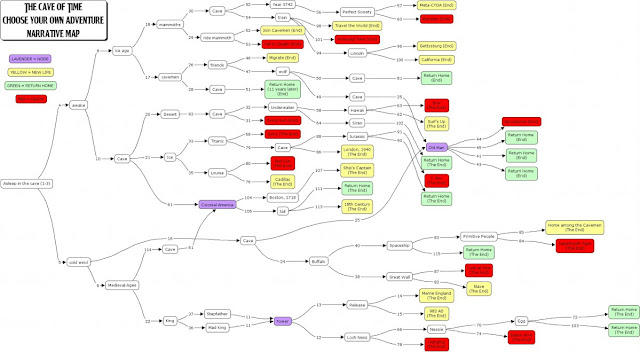
From there you keep reading one page at a time, with the bottom of the page asking you to make a choice (or sending you to another page without choice). As you can see from the narrative structure map (that I remember drawing out as a kid!) there are merging paths and leaps as you work your way to a conclusion.
Here's a video showing you how to do this ... it's not a masterpiece I'm writing, it's just an example (isn't done better than perfect?)
Extension!
What's really interesting is you could add in the BreakOut idea... by collecting clues from within the story you could use the Password Protect for Sections (right-click a Section and choose Password Protect). It adds another layer to the reading.
If you want to help edit Cowboy Bob's Adventure, click here. (Yes, it's an open editing link -- I like to live dangerously. But you can only edit it in the browser.).
If you just want to read Cowboy Bob's Adventure, click here. (It's not going to win the Booker Prize, that's for sure).
I spent way too much time as a kid reading through the Choose Your Own Adventure books. Like these folks (link) I would map out the different paths to see what possibilities existed in the text. If you haven't ever read one, the format is pretty simple (well, to the reader). You start at Page 1 and read a few paragraphs that are on the page, describing your situation. In "The Cave of Time" you're out hiking in the woods and come across a cave that you decide to explore.


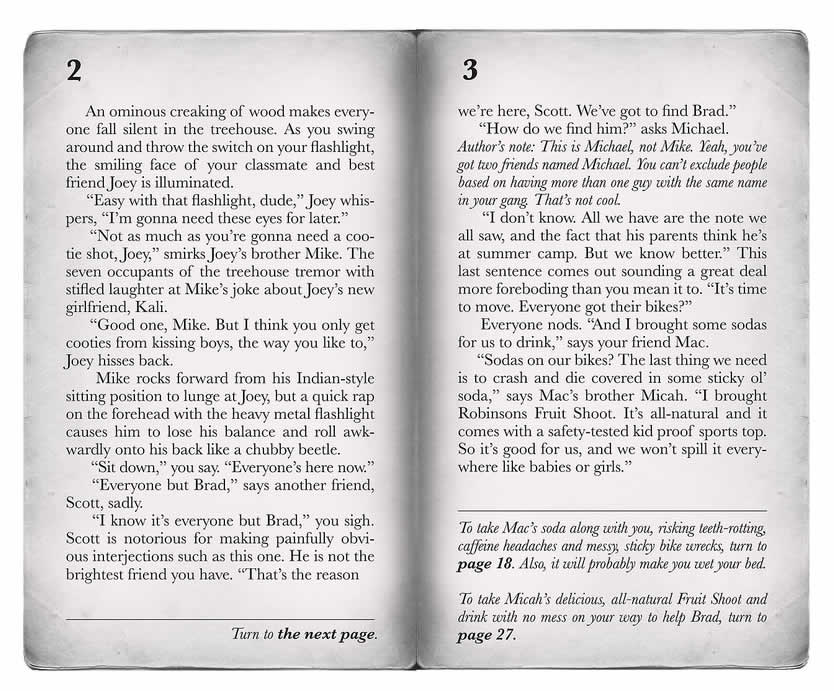
After turning to the next page (as instructed) you are then required to make a choice, which will require you to jump to a much further page in the book (say, 18 or 27 as in the example below).
From there you keep reading one page at a time, with the bottom of the page asking you to make a choice (or sending you to another page without choice). As you can see from the narrative structure map (that I remember drawing out as a kid!) there are merging paths and leaps as you work your way to a conclusion.

Okay... enough reminiscing. Mark Herring's post from today "How to use Google Forms to make a 'Choose Your Own Adventure' Book" prompted me to choose it as today's November blog topic. This would be so much more fun (and easier and more creative!) using OneNote.
How to:
1) Create a new OneNote Notebook (you can use your School or your Personal account -- check out yesterday's blog if you don't already have OneNote. Remember -- OneNote is free for everybody so even if you're a Google/Apple/SinclairZX81 school, you can still do this activity!)
2) Create any number of pages in the first Section Tab... start naming them Page 1, Page 2, page 3, etc.
3) On Page 1, put the introduction to your story. Remember, since this is OneNote, you can draw, type, insert picture... even embed a YouTube/Vimeo/Stream video onto the page to make it more interesting. Students could sketch pictures for every page using digital ink in OneNote!
4) At the bottom of the page, write your choices -- what decision does your reader need to make? Send them to a new page as a result. They can then scroll/click on the new page number from along the side.
OR
You can use the internal linking within OneNote. If you have named all your pages as "Page 1", Page 2"... "Page 35" consistently, you can type [[Page 35] and it will automagically create a link to Page 35 as if it were a webpage! (if Page 35 didn't already exist, it would also create Page 35. Or you can go to the Page you want to link to, right-click and choose Copy Link to Page and then go back to the earlier page and highlight the text you want to link and then go to Insert --> Link and paste the link you just copied. Like I said, it's easier to use the [[page name]].
5) Keep building your story. Now, of course, you should likely map it out as they've done above and then transfer it to OneNote to ensure you have an interesting narrative.
Since this is OneNote, you can share the writing & design! Just click on the SHARE button and type in another teacher or student email address and they will be able to edit along with you.
When you're ready to publish, click on the SHARE button again, and create a VIEW link and share that link with your readers.
Here's a video showing you how to do this ... it's not a masterpiece I'm writing, it's just an example (isn't done better than perfect?)
Extension!
What's really interesting is you could add in the BreakOut idea... by collecting clues from within the story you could use the Password Protect for Sections (right-click a Section and choose Password Protect). It adds another layer to the reading.
If you want to help edit Cowboy Bob's Adventure, click here. (Yes, it's an open editing link -- I like to live dangerously. But you can only edit it in the browser.).
If you just want to read Cowboy Bob's Adventure, click here. (It's not going to win the Booker Prize, that's for sure).
Comments