I think one of the biggest strengths of the OneNote Class Notebook was that it was started in the classroom and designed, from the bottom up, by classroom teachers in their classrooms. Even after Microsoft took it on and began adding to its functionality, they have kept teachers very close to the developers and each addition goes through rigourous testing by real classrooms around the world.
 So how can you get started? First, you need an Office365 account. Now, you may already have one for free from your school but if not, an individual teacher can get one on their own -- no administration needed! Visit http://www.onenote.com/classnotebook and click on the link "Sign up for a free Office365 Account" (it will let you know if you already have one if you try to sign up for another one). Use your School email to sign up for the account.


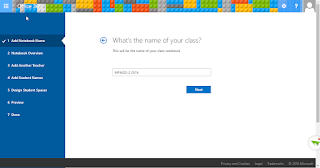 1. Give the Notebook a name. Hint. Include the course code, section & year! Don't worry about the name, like Mathematics or Physical Geography. Inside of OneNote you can give it a long name but for administration, use the code! You'll have another Notebook next year/term and will want to be able to easily tell them apart. So for me, I have MPM2D-2 2016 instead of Grade 10 Mathematics Section 2 2016/2017. Less is more. Put your own name in and click NEXT.
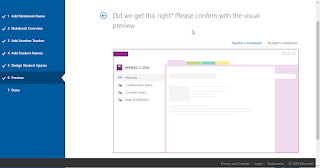
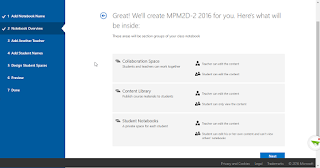 2. See, the next screen doesn't have you do anything -- it just lets you know that the Notebook is broken up into three main sections: Collaboration (everybody can do anything), Content (the teacher can edit, the students can only read/copy) and the individual student sections. Click NEXT.
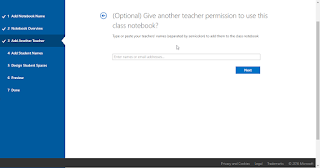 3. This screen asks for any co-teachers. But it could also be a Head of Department, Mentor, or some one who teaches the same class, or even just a critical friend who you want to have access to your materials. This is also change-able any time during the school year, so if you are going to be away for a week, you can add a teacher into the Notebook and they'll see everything you've done with the students. At this point, you'll likely click NEXT ... or add a friend who'd like to see what OneNote is all about!
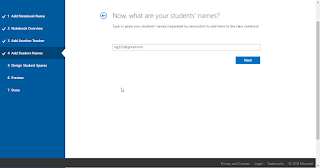 4. Now we add the students. I find it easiest to have an Excel spreadsheet with all of their emails. Add another column fillled with semicolons and then copy/paste from Excel into the box. You can type them manually AND you can always add students later so this is something you can do in class (set them some work while you add their emails that you just collected).
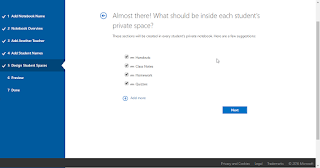 5. The last thing is to decide which sections you want in each student section group. Since you can always add more sections later, don't worry too much about this. Hint: I would turn all of the suggestions OFF and add three sections: one called "_A" (where they will put any document they want you to look at), one called "_R" (where YOU will put any document you're returning to them) and then "Unit 0" (which is where all the administrivia of the course will go). Everything after that you can push out during class or the students can create on their own. Why the Underscores ( _ ) on the first two? So they always appear at the front of the section :)
6. And the last screen shows you the overview. Go ahead and click NEXT and boom! Emails get sent to you and to the students you listed with the link to the Notebook.

Because OneNote is cross platform, the link always opens up on the Web ... but if you have OneNote installed on your device, you can click on the EDIT IN ONENOTE button and it will connect to your device and will sync from that
point on. But it's nice to know that you can always get at your notes from any device. As I always say, I can throw my laptop into the lake and pick up another device and keep learning. It helps my school is on a lake, so the same thought may not work for you.
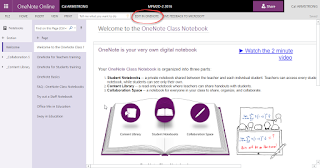
All you have to do is add content to the pages in the Content Library and every student can see it. Anything the student puts in their section, you can see and give feedback on. And you can all work together in the Collaboration Space.
Remember you can always go back to http://www.onenote.com/classnotebook to add teachers, students or make structural changes to the Notebook, like adding a private teacher section. But that's for another post.
And, you can make as many Notebooks as you want. Have one for your school club, your sports team or your teacher PLC group!
Hint: Have your Head of Department create a Class Notebook with them as "teacher" and all of the members of the department as "students". Use the Collaboration Space to develop course content and work through pedagogical questions while the HoD uses the Content Libray for administrative purposes and each teacher uses their section to work on professional learning. Remember to include the year in the Name of the notebook for year-over-year!
This is the first post in a series showing how to setup & use OneNote Class Notebooks
So far we've done:
Creating your first OneNote Class Notebook (this post)
The first page of your Class Notebook
Putting content in your Class Notebook
Giving content to students
Distributing content in your Class Notebook (the video)
Facilitating Feedback in OneNote (Review Student Work)

Now that you have your Office365 account tied to your school email, head back to the first screen at http://www.onenote.com/classnotebook and click on CLASS NOTEBOOK SIGN IN. The fun begins!

Before you start, you should have the email of at least one of your students - although you can start with a completely no-student notebook if you want. You can add (or subtract) students at any time from a OneNote so don't worry if your classes are still changing. They really only need the email to ensure during setup that only they have access to their work -- it's not needed to submit HW or take notes. Everything in your class will now happen inside of OneNote -- you'll never return to email or files or folders or dropboxes or any of that 1990s era nonsense.
After you sign in, you'll get the main menu for setup. We only visit here to create or change the structure of the OneNote. Again, almost all of our work is done inside of OneNote once we set it up the first time.
Ready? Click on CREATE A CLASS NOTEBOOK.
There are seven steps. Well, only really 4 but seven things you click through.
 1. Give the Notebook a name. Hint. Include the course code, section & year! Don't worry about the name, like Mathematics or Physical Geography. Inside of OneNote you can give it a long name but for administration, use the code! You'll have another Notebook next year/term and will want to be able to easily tell them apart. So for me, I have MPM2D-2 2016 instead of Grade 10 Mathematics Section 2 2016/2017. Less is more. Put your own name in and click NEXT.
 2. See, the next screen doesn't have you do anything -- it just lets you know that the Notebook is broken up into three main sections: Collaboration (everybody can do anything), Content (the teacher can edit, the students can only read/copy) and the individual student sections. Click NEXT.
 3. This screen asks for any co-teachers. But it could also be a Head of Department, Mentor, or some one who teaches the same class, or even just a critical friend who you want to have access to your materials. This is also change-able any time during the school year, so if you are going to be away for a week, you can add a teacher into the Notebook and they'll see everything you've done with the students. At this point, you'll likely click NEXT ... or add a friend who'd like to see what OneNote is all about!
 4. Now we add the students. I find it easiest to have an Excel spreadsheet with all of their emails. Add another column fillled with semicolons and then copy/paste from Excel into the box. You can type them manually AND you can always add students later so this is something you can do in class (set them some work while you add their emails that you just collected).
 5. The last thing is to decide which sections you want in each student section group. Since you can always add more sections later, don't worry too much about this. Hint: I would turn all of the suggestions OFF and add three sections: one called "_A" (where they will put any document they want you to look at), one called "_R" (where YOU will put any document you're returning to them) and then "Unit 0" (which is where all the administrivia of the course will go). Everything after that you can push out during class or the students can create on their own. Why the Underscores ( _ ) on the first two? So they always appear at the front of the section :)
6. And the last screen shows you the overview. Go ahead and click NEXT and boom! Emails get sent to you and to the students you listed with the link to the Notebook.


Because OneNote is cross platform, the link always opens up on the Web ... but if you have OneNote installed on your device, you can click on the EDIT IN ONENOTE button and it will connect to your device and will sync from that
point on. But it's nice to know that you can always get at your notes from any device. As I always say, I can throw my laptop into the lake and pick up another device and keep learning. It helps my school is on a lake, so the same thought may not work for you.
All you have to do is add content to the pages in the Content Library and every student can see it. Anything the student puts in their section, you can see and give feedback on. And you can all work together in the Collaboration Space.
Remember you can always go back to http://www.onenote.com/classnotebook to add teachers, students or make structural changes to the Notebook, like adding a private teacher section. But that's for another post.
And, you can make as many Notebooks as you want. Have one for your school club, your sports team or your teacher PLC group!
Hint: Have your Head of Department create a Class Notebook with them as "teacher" and all of the members of the department as "students". Use the Collaboration Space to develop course content and work through pedagogical questions while the HoD uses the Content Libray for administrative purposes and each teacher uses their section to work on professional learning. Remember to include the year in the Name of the notebook for year-over-year!
This is the first post in a series showing how to setup & use OneNote Class Notebooks
So far we've done:
Creating your first OneNote Class Notebook (this post)
The first page of your Class Notebook
Putting content in your Class Notebook
Giving content to students
Distributing content in your Class Notebook (the video)
Facilitating Feedback in OneNote (Review Student Work)
Comments